


There is nothing more appealing to a potential client than a beautiful company website. By taking the time to plan, design, and develop an attractive business website, you will not only produce more clients, but may also see additional revenue streams from indirect sources as well.
We’ve all seen the “bad” websites, with clunky graphics, poor font choices, and a completely confusing organizational strategy. But, I am sure everyone has also seen some stunning websites too. A beautiful website not only makes customers want to learn more about a company, but also gives them a look at how professional that company is when compared to the broader marketplace. In fact, a 2017 research study published in the online Journal for Communication in Media Technology showed that website design and website components (navigation, organization, simplicity) were key factors in engaging users (clients) for future communication.
In this article, I am going to provide a step-by-step guide on how to create a stunning website for your landscape design business from scratch. Even if you’ve never created one before, these steps should provide you everything you need to know to get started putting your business website together.
The steps for planning and developing a design company website are listed below. Although this article focuses primarily on garden and landscape design businesses, the content can also be utilized for any green-industry profession.
Step #1: Set Up Website Hosting
For people that do not have background in computer science, the terminology involved with setting up and running a website can be confusing – it was for me as well. The term “hosting” refers to a service provided by a company for keeping all of your website data available 24/7 on a computer, or computers, for people to access within seconds from anywhere in the world. Without hosting, your website would exist, but nobody would have the ability to access it.
There are several wonderful companies that provide hosting services for new businesses. When looking for a hosting service, you want to ensure they meet three specific criteria:
- They have live support, whether phone or chat, available 24/7 – this can come very handy in situations where you are having trouble with your site.
- They have several levels of hosting services, such that you can start at a basic level and increase your tools/web presence as your business grows.
- The hosting company has a solid reputation for privacy protection – the last thing you want it for your personal information to become public because of issues related to hosting.
For all of the various websites I’ve created throughout the years, I have always used HostGator. Even this website (draftscapes.com) is hosted by HostGator. The HostGator service offers three separate plans for new websites, along with great customer support, and a content dashboard which can allow you to customize almost anything in your website. I have had nothing but success with the company. If you are interested in using them for your website hosting, you can locate their services here.
Another great web hosting company is Blue Host. They are well respected within the industry and provide all three essential criteria listed above for a hosting company. I have never personally used them for my website development, but have heard many good reviews from others. You can find their services in the link below.
Step #2: Developing Your Website’s Design (Website Creators or Custom Design)
The next step in creating a website is to choose both a domain name and the website software you will be using to create the site. We will look at both individually and then review service providers that offer all-in-one packages.
A domain name simply refers to the url of the website. For example, the domain for this website is draftscapes.com. When choosing your domain, first you will need to find out if it is available. If you followed the Landscape Design Business Series, I noted that this is an essential step when choosing and registering your business name.
Likewise, you want to ensure your domain name is available and is very similar to the given name of your business. For example, you would not want to register your business as “Creative Landscapes”, only to find out that creativelandscapes.com is not available as a domain name. Instead, choose your business name and domain name together.
When deciding on a domain name, I highly suggest ensuring you obtain a .com domain. A solid .com domain name indicates authority on the web that many clients will gravitate towards. Typically, users find more authenticity and trust in a .com name versus the same name which utilizes a .net or .design.
In certain circumstances, for organizations such as nonprofits or educational institutions, using a .edu or .org is acceptable, but for landscape companies you should always strive to get a .com. If this means you need to slightly alter your business name, then it will be well worth the investment in the long run.
To check domain availability, you can simply search within your hosting platform or use a separate free tool online.
Finally, you will need to decide if you wish to utilize an all-in-one website hosting and building service (such as Wix or Weebly) or if you wish to build and run your website independently through WordPress. Both options have advantages and disadvantages.
All in One Builder (Wix)
The most prevalent and useful all-in-one website hosting and building software is Wix.com. The service not only provides hosting for paid subscribers, but also offers a variety of templates that allow the business owner to drag-and-drop information directly into the framework of their website. This type of service is great for complete beginners that do not wish to spend any real time learning web building or the specifics in creating a website. However, since this is a premium service that Wix provides, it will also costs much more than running your own domain. A standard business website will cost anywhere from $20-$50 per month.
There are other disadvantages to all-in-one builders as well. First, you are limited to the templates that they provide. You may not like the designs of their templates, or they may not be useful for your specific business – unfortunately, they offer very little customization.
Secondly, the all-in-one builders have also been known to be poor at SEO (Search Engine Optimization). SEO indicates a website’s ability to rank in the top search results in search-engines like Google or Bing. This is a very important attribute for landscape design businesses. For any business to be profitable, you need to ensure that your name is directly in front of your customers when they search for your industry.
If someone google searches “landscape designers near me”, it is essential that your company be ranked high on that list. Unfortunately, this is where services like Wix fall short.
WordPress (Custom Building)
The other option is to utilize WordPress. WordPress is a website software program that is “open-source”, meaning it is completely free to download and utilize for anyone. Globally, it is by far the most popular web-building software across the internet. You can setup your WordPress website within minutes directly from your hosting platform such as HostGator or Blue Host – and besides paying the initial domain name – the site will cost you nothing to set up.

Besides the obvious advantage of being completely free, WordPress offers the additional benefit of being completely customizable. You do not need to even know coding in order to create a stunning site through WordPress. The software offers a variety of free themes that can be used for your site. (Something we will cover in the next section).
WordPress is also very useful for SEO. Typically, wordpress websites rank high on search engines and the software offers a variety of plugins which can be added to your WordPress site in order to optimize your ranking – a popular one is Yoast SEO which ensures any of your content is formatted correctly to get high search rankings in Google.
The support community for WordPress is also second-to-none. There are a variety of tutorials available throughout the internet that walk you through the step by step process from purchasing hosting to setting up your WordPress site. One tutorial I found very useful was from instructor Tyler Moore on Youtube. It can be found here.
Step #3: Choosing a Theme and Site Builder
After you have chosen the type of website you will be creating (all-in-one or custom), you will need to choose an overall theme and layout for the site. Themes are available in many styles, ranging from informational news themes, personal blog themes, and business development themes. Although it might be tempting to choose an attractive and fancy art or photography theme to show off your projects, I would highly recommend selecting just a simple business theme instead.
A standard business style website should have an attractive home page (discussed in more detail later) along with, at minimum, pages dedicated to Services, Contact Info, Company Mission/Info, and Past Projects pages. You may also wish to include additional pages for Client Testimonials or Company News if you so desire.
If you are using an all-in-one builder such as Wix, there are several themes to choose from that are available through their service. You would simply need to drag and drop your content into the framework.
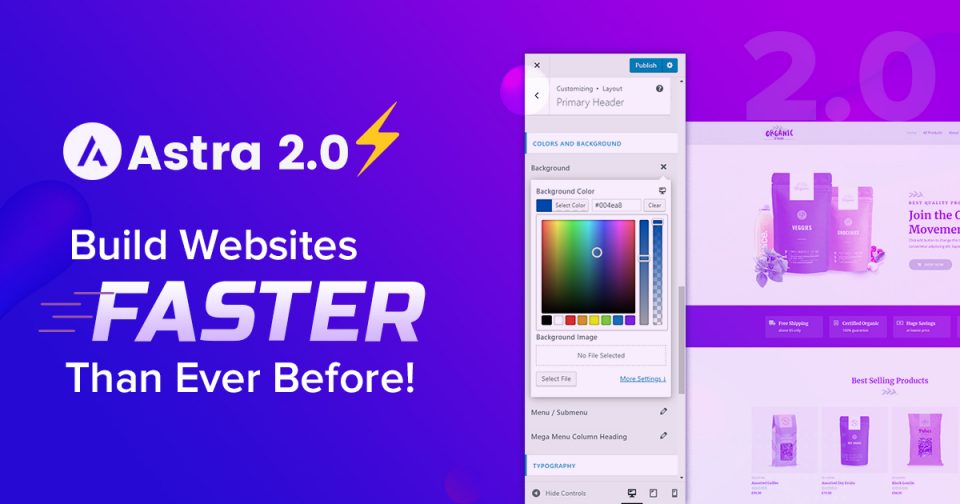
However, if you wish to make a more custom and personalized theme specific to your business, you can download free WordPress themes from the WordPress Dashboard. Two themes that I have previously used and had success with are the Astra Theme (pictured above) and the OceanWP theme. Both themes have very beautiful graphic layouts and allow for any customization you desire. They also come with additional premium themes, in case you would like to upgrade to a paid theme – something I wouldn’t recommend.
There are a wide variety of themes available on the WordPress software, so you can search to see what is available and best suit your needs. Your own imagination is the only limiting factor – there are literally thousands of free themes available for you to access from the WordPress dashboard. When selecting one, just be sure it is compatible with what is called a “site-builder”.
A site-builder is basically an added plugin that you use in conjunction with WordPress which allows you to edit and create content on your theme. The two most common site builders are Elementor and Beaver Builder. Both plugins are fantastic at helping you create custom design websites without knowing any code. The Astra and OceanWP themes are both compatible with Elementor and Beaver Builder.
You also should ensure that the theme you select is “responsive” – a term that refers to the ability of the website to modify its content for viewing on mobile or tablet devices. In today’s world, most consumers are choosing contractors right from their mobile device. By keeping your website responsive to many devices, it ensures your company website looks attractive no matter which platform your customer uses. Both Astra and OceanWP are free responsive themes.
Step #4: Developing Your Home Screen
So you have paid for your hosting, setup your domain name, and downloaded your theme – now what? Well, you now need to create the homepage for your site.
Home screens for websites are the first impression most people have with your company, so you want to make sure you give them a hint of what your business is all about. There are a few things to consider when developing your home screen.
First, you want to make sure you don’t clutter the screen with all the content about your business on the first landing page. The purpose of the home screen is to attract and seduce the client to engage with your website and company, so provide them some valuable photographs that will make them want to stay and view the rest of your website.
Ensure your home screen has nice large pictures that rotate or can be toggled by the user (often called an image carousel). The scrolling images should provide the viewer with some beautiful photographs of your past projects, or perhaps even drawings you’ve done of designs that weren’t installed. Anything that can entice the interest of the potential client should be there.
Often times designers make the incorrect choice of only featuring recent projects on their homepage, even though they may not be the nicest – try to avoid this. Although a project might be several years old, if it is a beautiful image that showcases your talent in landscape design, it should be front and center regardless of how old it is.
You should also make sure your homepage clearly states your company name, the general geographic region (or address) of your business, and a company tagline. For example if my design company was called “Fruitful Landscapes” and we specialized in edible landscapes for clients, our tagline might be “building beautiful spaces for your viewing and eating pleasure”. The tagline should provide a quick snippet as to the overall niche of your company.

Once you’ve successfully designed your homepage with the image carousel and your company tagline. You just want to ensure your other website pages are clear and accessible for viewers to navigate to if they like what they see.
Step #5: Project Portfolios & Service Page Development
Two of the most important pages for your landscape design business website are (1) a portfolio of your past projects and (2) the services your company offers. When potential clients find your business and its associated website, they have already identified that your company (based on its name or location) might be suitable for their project needs; therefore, it is your responsibility as the business owner to show them what you are capable of. A poor Projects or Services page will simply leave the client confused and less likely to contact your company about their needs.
Projects Page
The link to the Project page for your website should be easily viewable in two locations on the homepage. First, be sure that the Projects page link is located in the top menu of the site, alongside your “About” section and other important pages (seems common sense right?). You should also ensure that there is a direct link to the Projects page near your photograph-carousel you created on your homepage in Step #4.
Under each image on the page, you should have a brief caption of information along with a link to more information – that link should bring traffic directly to your project page. This will help in getting your work in front of the client- an essential step when hiring a contractor for a specific job.
When potential customers click on your Projects page, you should be sure that it is organized clearly by project type, size, or location. For example, you might have a company that specializes in residential landscape design – for your Projects page, perhaps you have one section which links to outdoor kitchen projects, another section for ornamental garden beds, and a third that links to ponds or waterscapes.
You want to avoid having all of your projects listed haphazardly. If you client has a specific need, you should ensure your website clearly highlights your ability to fill that requirement. If a potential customer needs to search, scroll, or scavenge to find a comparable project, then your site is hurting you and not helping you.
Three to four sections on your Projects page should be the maximum. Anything more and it will quickly get difficult to organize effectively. Your sections/categories on the page should be based on the overall emphasis or mission of your company.
Once a viewer selects the overall category, then you can list each project that fits within that service. (Don’t forget, duplicates are not problematic. If you have one project that fulfills multiple categories, be sure it is listed on both pages.)
The individual project pages should have at least 4-8 pictures each, showing both a before and after of the project site. Don’t worry about writing too much about each project, but be sure to highlight the needs to the client, the objectives of your design, and a quick description of the finished product. Anything more can be discussed during an in-person consultation.
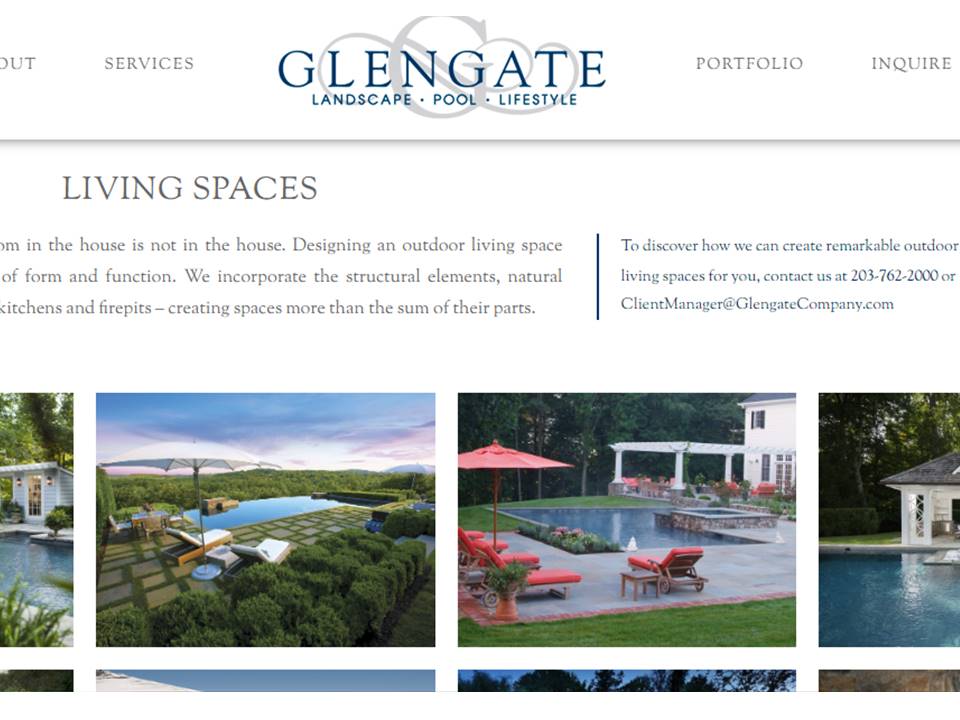
Below is a good example of a well-designed projects page. Notice the large thumbnail images and the category of the specific service provided on the top. Clients can select any of the related projects by clicking on the photographs they find interesting.
Services Page
As for the Services page, this is typically much simpler to organize. Similar to the Projects page’s link on the homepage, you should also ensure there is a Services link in the top menu on the homepage. Once clicked, the visitor should be brought to a page that clearly itemized what your company can provide to the client.
I want to be crystal clear here – the services page should not be filled with long-winded explanations of the mission of your company, or why someone should hire you. The services page function is to provide a distinct overview of what you offer. Anything more is wasting both your time and the clients.
The services page could be formatted in an itemized list or broken down in paragraphs with bulleted descriptions. Whether or not pricing should be listed on the Services page is a difficult question – but I would suggest not adding any price estimates as each project requires its own specific price-point – especially for design/build firms.
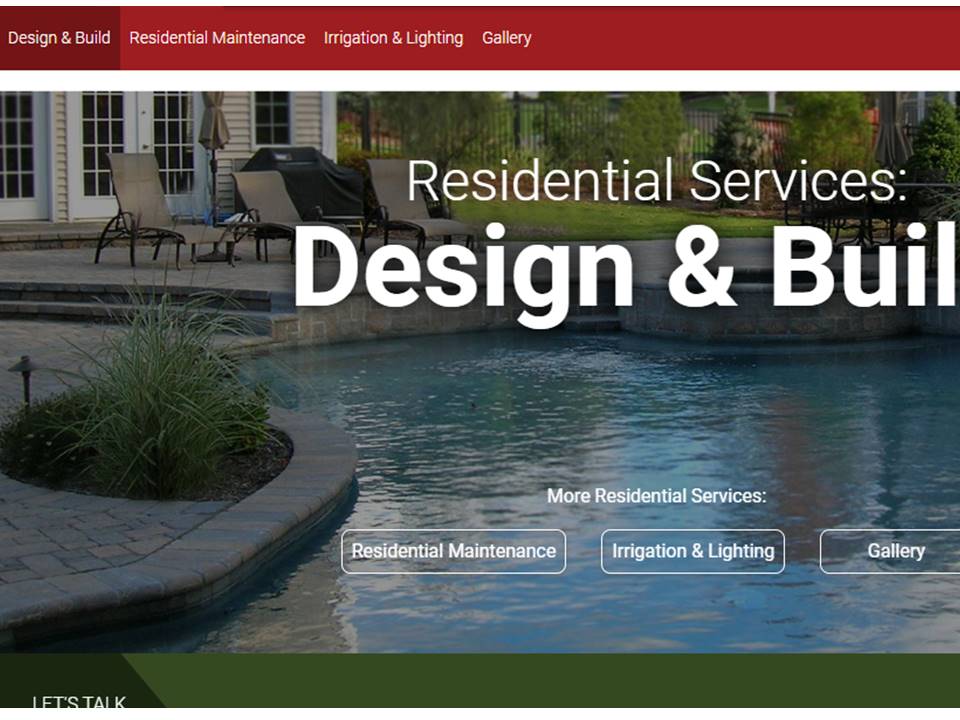
Here is a good example of a well-organized Services page from Winterberry Gardens. Note how the individual services are linked at the top menu.
Step #6: To Blog or Not to Blog
This next step is one that I feel strongly about for client acquisition, but it is not something many landscape designers consider when starting their business – blogging.
Customers within your geographic area often have gardening, design, or maintenance questions that don’t necessitate hiring your company outright. However, the questions they search for (often through google) could bring them to your website which would highlight your company as an authority on a particular landscape topic.
For example, if a customer was thinking about pruning the hydrangeas in their backyard, perhaps they would google search “How To Prune Hydrangeas”. If your company has a well-developed and thorough blog article explaining the proper times and techniques for pruning a hydrangea, the customer is more likely to return to your website for additional information in the future.
Additionally, if that same customer ever does wish to hire a designer for a project in the future, your company would be considered due to their experience of learning from your site. Essentially, the articles you write act as marketing channels for future customers, while also presenting your company as an authority within the industry. Since the articles will stay online indefinitely, they can serve as marketing channels for several years after writing.
Some landscape designers have had success with “garden coaching” which essentially means providing advice to clients on their properties without actually physically completing the work themselves. The blog posts serve a similar function, but on a broader more universal scale.
To get started doing this type of writing, use past projects or clients as an example. What questions did they ask? What are some questions clients may be wondering before they look to hrie a company? Any of those questions can be a nice article for your design blog. Furthermore, you can market your company within the article itself, by referencing the services you provide and linking to other pages on your site – a win-win.
Step #7: Testing Site Speed
The final element you need to consider when developing a website is site-speed. It is just a standard fact of the internet that websites which load faster have greater traffic and more consistent search results compared to slow websites. Think about it from your own experience- how many times did you stay on a website past 10 seconds if it didn’t load? Probably very few.
You want your website and the stunning photographs of your projects to load quickly and easily for the potential client so that they don’t need to consider “bouncing” to another site. (Bouncing is an internet industry term that refers to viewers leaving a website quickly.)
So the two questions you need to ask yourself when developing a speedy website are (1) How do I test my website to ensure it loads quickly for users? And (2) What steps can I take to ensure my site loads quickly? I will answer each individually.
How do I test my website for load speed?
There are two great free website services that conduct site-speed analysis and can provide feedback as to the quality of your website. The first is Google Page Speed Insights . You simply input the specific website address you wish to test and the Page Speed Insights tool will provide information as to how quickly your site is loading and provide specific recommendations on how to make it run faster.
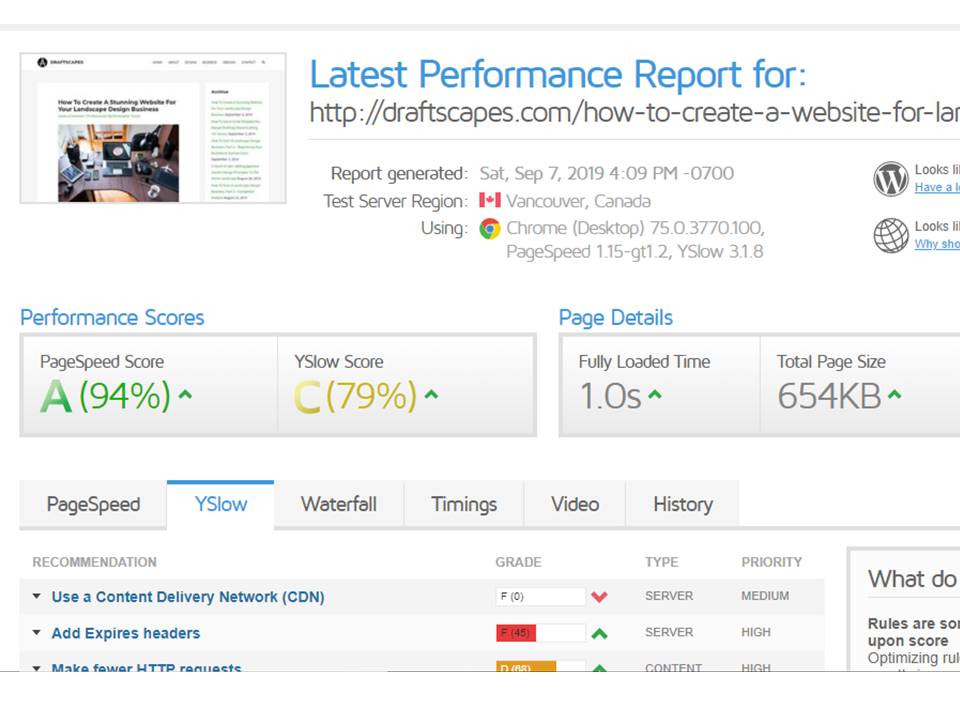
The second is GTMetrix. It works similarly to Google Page Speed Insights, but also utilizes a different speed metrics developed by the website development companies Y-Slow. You can see in the screenshot below, this website article “How To Build A Stunning Landscape Design Website” received an 94% on Pagespeed and a 79% on YSlow with a total load time of 1.0s – that is fast!
So how did I get this site to load so quickly – this brings us to the next question.
What steps can I take to ensure my site loads quickly?
From all of my research, there are three key areas you need to optimize to ensure your website loads quickly. The first is site building. Unfortunately, if you are using an all-in-one site builder like Wix.com or Weebly (as discussed previously), your choices will have very little impact on the speed of your site. In my experience a customized WordPress website will outcompete any all-in-one builders with very little effort. So if you want to make sure your company website loads quickly and gets customers to stay on the page – make sure you setup hosting through HostGator or Blue Host and then build your website in WordPress.
The second step for speed optimization is image compression, especially for design project pages. Although that beautiful 50MB TIF File looks so great blown up on a client’s wall, it will take an eternity to load on your website. Most websites only utilize PNG or JPG files for images, with a total size of no more than 500kb – anything more than this and you will be sacrificing valuable load time.
To compress your images, you can run each image through a free online image compressor individually, or you can download an image-compression plugin into your WordPress dashboard. The most common image compressor is ShortPixel. It runs in the background and does all the work for you to optimize the images that you upload.
The third step is what is called website “cache” – you’ve probably heard of it before but had no idea what it was or how it was used, understandably so. But now that you are running your own business and website, every marketing edge matters and optimizing your cache will too.
Cache simply refers to the ability to store website data (images, text, etc.) on the local user’s browser for future recall in order to reduce the time it takes the server to request that information. Confused? Ok, let’s look at it this way.
Let’s say your own a pizza shop and your pizza is a website. When someone orders a pizza for the first time (i.e. clicks on your website) you need to put al the ingredients together, bake it, and deliver it to the customer. In the future, it might be more efficient to have a pizza pie already baked beforehand to simply deliver when the client needs. That second “backup” pizza is cache. It stores site information so that if the user requests that website again, it can deliver the content much more quickly.
Again, in order to optimize your site’s cache you need to be sure you are developing it on WordPress. From there, you can simply download a cache plugin, like WP Total Cache, which will run through the background of your website and optimize the cache you provide to users.
By setting your website up in WordPress, compressing images for website quality graphics, and optimizing your website cache, your company’s site will be faster than 80% of the business out there and clients will take notice.
Conclusion
As you can see, setting up a website for your company isn’t as simple as it may seem. The time and effort it takes to start your business should also be reflected in the effort you put into your website. Look at other company websites in your area and begin to develop a list of your “likes” and “dislikes” of their website’s approach. See how you can improve on their ideas to gain a better edge in the market. But most importantly, remember that your website is a tool to acquire customers. Make sure company information is clear and that you have a solid plan to capitalize on any inquiries.
For more information about starting or running a Landscape Design Business, make sure you take a look at the articles in the Business section of this website.
____________________________________
Important Legal Disclaimer: This site is owned and operated by Draftscapes. We are a participant in affiliate marketing programs designed to provide a means for sites to earn advertising fees by linking to participant vendors. Affiliations include Utrecht Art Supply, HostGator, Blue Host, and Amazon Associates. Draftscapes is compensated for referring traffic and business to these companies. Recommendations for products or services on this site are not influenced through the affiliation.