

In this article, I will review 3 exercises that I have seen improve the sketching ability of students and designers over time. With practice and commitment, these exercises should assist you in developing better drawing habits for conceptual and real outdoor spaces.
My Sketching Story
When I started to become more serious about landscape architecture as a future profession, I knew I had to work on my landscape sketching. Throughout high-school and for part of college, I didn’t really practice too much and my overall style was more cartoonish than I would have liked.
Luckily for me, I had great resources of faculty and fellow students that helped me create practice exercises to improve. I spent about one-hour per day sketching. I drew everything I could see, often multiple times, practicing different techniques and using different media from graphic pens to charcoal. The more I sketched, the more confident I became, and the better my drawings were. Now I sketch because I love to, and it is a wonderful habit to develop.
To be clear: there is no single tool, exercise, or “hack” that can make you become great at sketching, but I have never met a student who lacks the ability to improve. Below, I will be providing 3 exercises that have helped both myself and students improve their drawing skills, but before I do, I would like to give the most essential secret to become great at sketching. Are you ready?
In order to get better at sketching – you need to sketch! Groundbreaking, I know.
So, as long as you can put in the effort, the exercises below should help you progress more efficiently with your dedicated practice.
A Brief Note on Sketchbooks
Before we delve directly into the exercises, I want to make a brief disclaimer about the type of drawing medium and brand of sketchbook you purchase. I believe a sketchbook is a very personal item to a designer. It is your own little record of thoughts, details, and occurrences that you can use in your next landscape design or future projects.
Because of this, there is no “best” sketchbook for drawing. It truly irritates me when I see online lists of “The 10 Best Sketchbooks” or “Only the Pros Use These 5 Sketchbooks”. Do not listen to these individuals; they are only trying to sell you something.
Here is my advice: use whatever sketchbook you feel comfortable with and experiment with different brands. I am still testing out new brands of sketchbooks even after 20+ years of practice – and I love it! Each different sketchbook reminds me of a particular time and place I was as a designer, like a little historical artifact of my progress over time.
Currently, I have two sketchbooks I alternate between: a Canson Hardcover Sketchbook and a Pentalic Pocket Journal. I have used both brands before and have been pleased with them. I use Copic pens with each – although if a particular scene inspires me and I need to sketch it, I use whatever is at hand that makes a mark.
Honestly, I’ve literally used a dried twig and a lighter to get burnt char on paper during one snowy afternoon in upstate New York.
Exercise #1: The Timed Sketch (Getting Your Point Across)
Recently, I needed to text my wife while she was at the store because we were all out of milk in the house. Typically, this would not be an issue, but for my hungry 10 month old son it was a dire need.
Having to calm my son, along with keeping my 3 year old daughter entertained as well, I didn’t have time to send a full message to my wife. All I texted was “Buy Milk”. Sure enough, she got the relevant information she needed in order to make the correct decision that benefited my screaming little boy.
If I asked one-hundred people to make the same request of milk using only two words, most would have an easy time getting their point across – “buy milk”, “need milk”, or “milk now” would probably be the most common phrases.
The reason that people would say the same two-words is because they’ve spoken and communicated verbally for their whole lives. They understand the key elements within a sentence that need to be immediately stated in order for their intent to be understood.
The same thing is true for visual graphics, but often designers don’t have the experience of synthesizing the information well enough to get their point across. This is the purpose of our first exercise – to limit the time you have to sketch so that you only focus on getting the key elements of the scene drawn.
For this exercise, you need to find five photographs of gardens, landscapes, or public parks. The photographs should be wide shots that show the entire space, or a large portion of it (you want to avoid pictures of a single plant, one bench, etc.).
Arrange the 5 photographs in sequential order randomly, one through five. Starting with the first photograph, give yourself a full 5 minutes to sketch the scene. Set a timer to keep you honest. Once the 5 minutes are up, put your pen or pencil down and move to the next page.
For the next photograph, only give yourself 4 minutes. Set the timer and sketch.

Acadia National Park 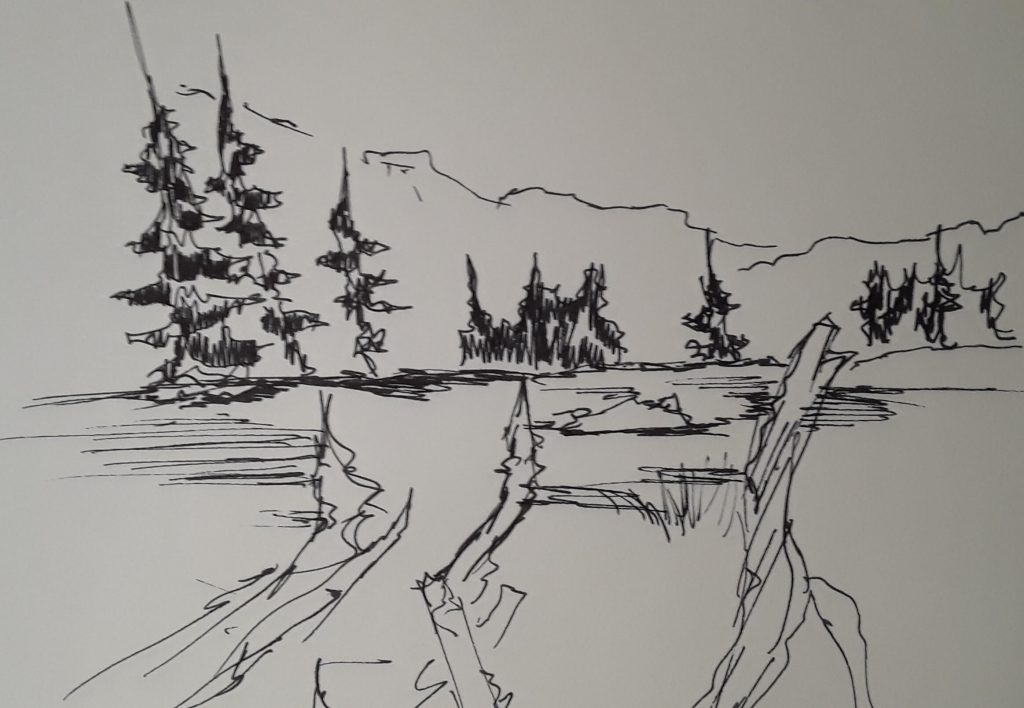
2 Minute Sketch Acadia
Keep progressing through the next three pictures until you are finally sketching photograph #5 within 1 minute. The entire exercise should take no more 15 minutes. After you have completed it, review your sketches and give yourself an honest evaluation.
Next time you practice this exercise, shuffle the photographs randomly again, and start over. Keep using the exercise weekly until you’ve sketched nearly all the photographs at each of the time intervals.
A Substitute Method for Exercise #1
In some cases, students have been too overwhelmed by the ticking clock to think critically about the image they are confronted with, so I have offered them an alternate method which has the same overall effect. It’s called “A Landscape in Seven Lines”.
Essentially, the student can take the same photographs as before, but instead of a limit of time, they have a limit of lines. They can only draw 7 lines on their page. They can take as long as they wish to draw, but as soon as they lift their pen off the sketchbook, the line is counted and they only have 7 lines in total.
The exercise makes students think deeply about the most important elements within the photograph as a means of representing it to a client or class.
Exercise #2: 100 Leaves (Repetition & Muscle Memory)
Have you ever said a word so many times in a row that the word actually loses its meaning? Take a moment to try it – say the word “tomato” one-hundred times. You’ll see that after about 40 times saying it, you no longer focus on the meaning of the word. Your mind wanders off while your mouth keeps enunciating the three random syllables that for some reason when strung together mean a delicious red summer fruit.
Often times when students begin sketching, they focus entirely too much attention on the complexity of the scene and the meaning behind it, rather than the forms that are in front of them. I’ve seen it over and over again.
For example, in my design class we might be practicing a sketch of a Pin Oak (Quercus palustris) or some other tree that has a very recognizable structure. The student will be so concerned with how the tree should look they don’t notice the actual forms in front of them.
For this exercise, we will try and break the connection behind the complexity of an image so that you focus only on the actual form itself. In order to do this, we must draw the same thing repeatedly.
To start, you need to find a leaf from a plant. Try to find a real leaf, not an image or photograph, we will be moving it around as we go. (Also, this exercise can be replicated with any common item, but typically I’ve had success with horticulture students sketching leaves).
Next, position the leaf on the surface of a board or desk in front of you. Take 1 page of your sketchbook and quickly (within 20-30 seconds) draw the overall form of the leaf. Repeat the same small sketch 24 more times so that you have a total of 25 leaves on your page. The size of each drawn leaf may vary, but since you will be drawing the leaf 25 times on this same page be sure to draw small. If you need more space, simply move to the back of the page.
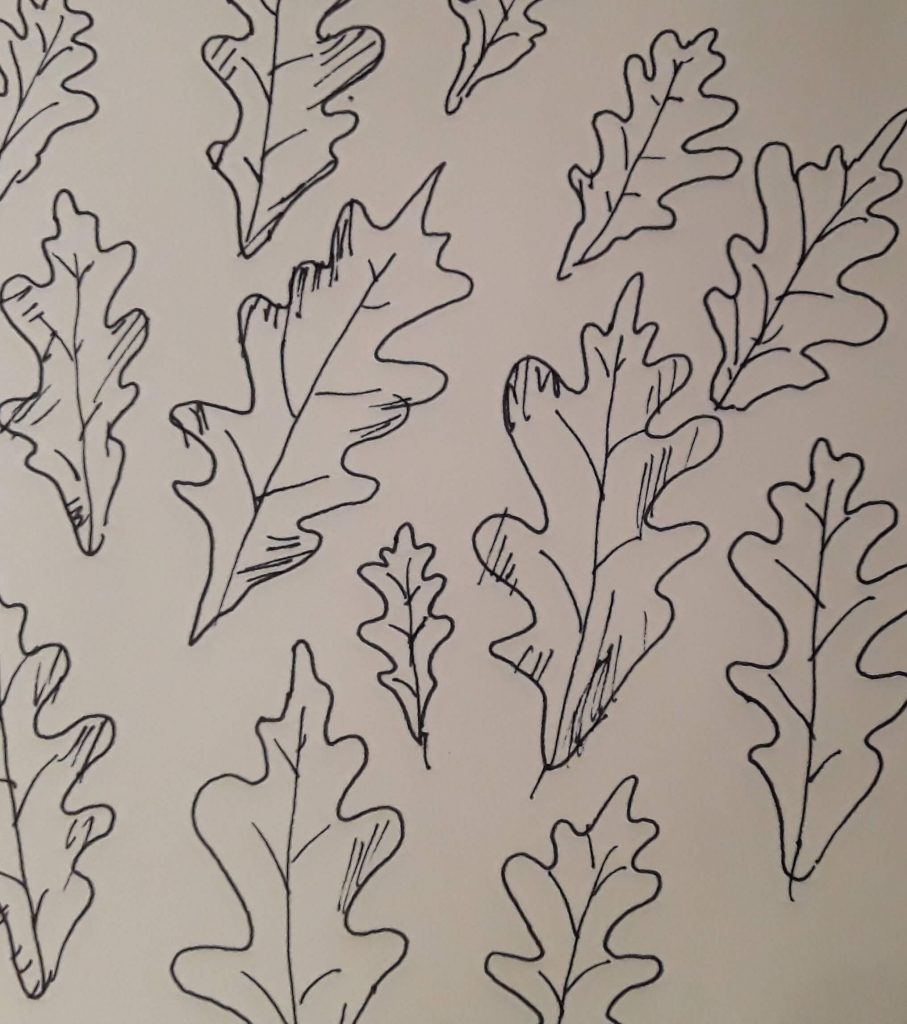
After the initial 25 sketches are done, move the leaf to a new location along with a new orientation (rotate it, flip it over, or stand it up against something). Repeat 25 sketches on a new page. Keep moving the leaf and sketching until you have a total of 4 pages and 100 leaves drawn. This should take no more than 1 hour to complete, but you can take short breaks in between pages.
A Substitute Method For Exercise #2
After some time, the “100 Leaves” exercise may get rather boring – and understandably so. Therefore, I do tell students to try switching over to a different exercise periodically that has a similar objective. It’s called “Drawing the Negative Space”.
To complete this exercise, you would simply find a plant (inside or outside) and instead of actively drawing the plant itself, you try to draw all of the empty space around and inside the plant instead. This takes a bit of getting use to, but you want to focus on the negative space only – deliberately drawing the air around and inside the canopy of the plant. By practicing this, you will be very surprised by the results.
Exercise #3: The Daily Diary (Learning To Love the Process)
One of the biggest problems I see when students sketch is a lack of confidence in their lines. It is an easy thing to spot when they are sketching because you will often see them lift their pen or pencil off the paper several times before committing to a line. Meanwhile, the confident designers often tackle the sketch head-on, and if there happens to be a stray or misplaced line, so be it.
The reason that some have confidence and others don’t truly boils down to daily practice. If you have never sketched a tree before, you will likely be nervous about making a mistake the next time you draw it. The problem is that most people feel that practicing drawing is a chore – a task to be completed rather than something to enjoy look forward to.
To combat this issue, we need to try and make sketching an enjoyable habit. The best way I’ve found to accomplish this is to make it personal experience and attach it to something a designer already enjoys.
To complete this exercise you must dedicate only 5 minutes a day, every day, for 1 month (30 days). For those 5 minutes, you should be in a comfortable enjoyable place doing something you would normally have been doing even if you weren’t sketching. The three examples I will use are grabbing a cup coffee, taking your dog for a walk, and listening to music.
Whatever activity you might enjoy, take 5 minutes while you are doing it and simply sketch something related. It can be anything you that wish – sketching a group of people at the coffee shop, sketching your dog while he/she runs through the park, or perhaps sketching an abstract concept of how the music makes you feel.
Whatever you might wish to sketch – just take those 5 minutes and sketch. The purpose of this exercise is twofold: (1) To make a more positive association with the act of sketching through pairing it with a leisurely activity and (2) To get in the habit of a regular sketching routine, which is essential for future progress.
A Substitute Method For Exercise #3
For most people, Exercise #3 really isn’t an issue because of its flexibility, but for those that still cannot find the time or enthusiasm to complete it; a good substitute would be “The Bedtime Sketch”. Just make it a habit, prior to going to bed, to put your sketchbook in your hands and before you drift off to sleep, take 5 minutes and sketch something that you remember about the day.
Learning from Other Designers
Finally, don’t be afraid to look for inspiration at other designers that sketch. There are a wealth of resources online and in libraries cataloging famous artists, architects, and landscape architects and their sketchbook drawings.
For those in the landscape field, a good place to start would be reviewing Transforming the Common Place: Selections From Laurie Olin’s Sketchbooks. They provide a good example of the type of sketching that a professional designer can do after years of practice and experience in the field.
If you liked this post and wish to learn more about landscape design and drafting, be sure to check our Design Resources section for more articles like this one.
____________________________________
Important Legal Disclaimer: This site is owned and operated by Draftscapes. We are a participant in affiliate marketing programs designed to provide a means for sites to earn advertising fees by linking to participant vendors. Affiliations include Utrecht Art Supply and Amazon Associates. Draftscapes is compensated for referring traffic and business to these companies. Recommendations for products or services on this site are not influenced through the affiliation.